Windows 2000 Modernization Guide
feat. Bonus Feature: Installing Office 2007 on Windows 2000
So, you want to use Windows 2000 in 2026? Well, you've come to the right place, although we're not the only place you'll want to keep handy. You'll find some great tips, software advice, and know-how at the MSFN Windows 2000 Forums. Special thanks to @win32, who provided many of the pointers and suggestions used in this guide.
Making Windows 2000 Usable in 2026
There are basically two routes you can take when using Windows 2000 today:
- Use vanilla Windows 2000
- Use BlackWingCat's KernelEx (Extended Kernel) to port some XP files over so more modern software can run on it
There's no right or wrong answer, and many people can get by just fine with vanilla Windows 2000. If that's you, check out the latest software available for vanilla Windows 2000. This guide focuses specifically on the second approach, with an emphasis on getting Office 2007 to run and work properly. Office 2007 is not natively supported on Windows 2000, but with some tweaks and patches, you can get it running so that you'd never guess it wasn't natively supported.
So, without further ado, after much trial and error, we present to you this comprehensive Windows 2000 Modernization Guide. This is not the only way of doing things, but in our experience, it is the path of least resistance, so to speak:
- Obtain a Windows 2000 Professional ISO — Unsurprisingly, you'll need the original installation media for Windows 2000 if you want to use it. If you don't have an install disc laying around, WinWorld has you covered. We personally use the Select version with Service Pack 4 already included.
- Extract the ISO — Use 7-Zip to extract the ISO. You'll need the files in a moment.
- Download HFSLIP — You can download HFSLIP at this link. You'll see a HFSLIP folder and inside that a FullPack folder. Download the .7z file inside that folder.
- Slipstream HFSLIP into your ISO — When you extract the 7-Zip file, you'll find a batch file inside. Run that once and it will create some folders, including a SOURCE folder. Move the files from the extracted Windows 2000 ISO into this folder. Now, run the script again. It may take a while (maybe half an hour or so, your mileage may vary). Follow the prompts in the command window (start off by doing option A and then hitting ENTER at the second prompt).
Ironically, we find it's easiest to do this on an actual Windows 2000 system. If you use an NT 6+ system (Vista, 7, 10), you'll be inundated with countless UAC dialogs. HFSLIP doesn't actually install any components on your system, but it integrates them into the ISO. If you deny the UAC prompts, the ISO will successfully install Windows 2000 when it's done but the modifications later on won't work. We prefer using Windows 2000 to prepare the modified Windows 2000 ISO, but regardless of which OS you use, use an administrative account. If you're on NT 6+ with UAC enabled, you'll need to disable and re-enable it later. Even clicking Yes 200 times will get annoying quickly!
SOURCESS is the folder containing the newly slipstreamed Windows 2000 source files. When it's all done, you'll end up with a bootable ISO as well in the main folder, which you'll need next.
A word to the wise: if you're planning on installing Windows 2000 more than once, you'll want to keep this ISO file around so you don't have to go through the HFSLIP process again. Also, once you have the new ISO, you shouldn't need the original ISO anymore, so you can delete that and the original source files. You can even delete the HFSLIP folder and 7-Zip file — just make sure you move the ISO out of the folder before deleting the folder! It's preferrable not to have to do this all over again! - Install Windows 2000 — When HFSLIP is done running, you'll find in the HFSLIP folder a Windows 2000 ISO that's a bit bigger than the original one you used to extract the source files. This new, larger ISO file is the one you'll use to install. Burn this ISO to a disc (or if you're installing in a VM, simply use this ISO file to install).
The actual Windows 2000 installation is the same as vanilla Windows 2000 installation. You'll need to click Next a few times and choose your Time Zone and a few other things. - Download KernelEx — Download the latest KernelEx from the creator's website. Yes, the site is mostly in Japanese, but don't worry about that. At the time of this writing, the latest version was v3.0e (2019 Sep). If there's a newer one available, it will probably work.
Also, you don't need Extended Core, only Extended Kernel — that is, unless you need to use incompatible XP drivers, more than 4 GB of RAM, or more than 2 CPU threads. - Install KernelEx — If the executable is not stored locally (particularly if it's on a shared folder mapped as a network drive in VirtualBox or something similar), copy it to the Desktop or you will encounter issues! Run the executable you downloaded in the last step. If dialogs pop up, just click OK. At some point, a window should pop up with a number of checkboxes to toggle various options. Check the box that says XP-compatible winsock.
KernelEx will automatically restart Windows when the wizard is complete.
Disclaimer/Warning: The XP-compatible winsock has been specified as causing freezes with browsers and security software, but it's also been run just fine before with no issues. It may be necessary for Outlook 2007 to work properly. If you do encounter serious issues, you can reinstall, but this time keeping the winsock checkbox unchecked. - Get Ready to Install Office 2007 — Now, we will do the tricky part, as even with KernelEx, Office 2007 won't play nicely at first, even though 2007/2010 are supported with XP SP3. If you absolutely hate the ribbon or just have no desire for Office 2007, you can use Office 2003 (even on vanilla Windows 2000), but due to the prevalence of the newer 2007+ Office file formats as well as many tools and features available only in Office 2007 and later, we personally prefer Office 2007. To each his own.
You'll need the original installation media for Office 2007. We personally used Office 2007 Enterprise. If you have an ISO, extract the ISO (again, using 7-Zip), so you have all of its files in a folder. Importantly, you should have a setup.exe executable.
Disclaimer/Warning:You won't be able to uninstall Office 2007 later from Control Panel if you wish to, or using a program like RipOutOffice2007; you'll need to manually uninstall it if you need to for whatever reason.If you run NNN4NT5, then you can uninstall Office 2007 afterwards. Outlook 2010 reportedly doesn't really work at all (except for maybe PowerPoint Viewer), so considering that you won't be able to run anything newer than Office 2007 on Windows 2000, we feel this is a vacuous tradeoff, but keep that in mind. - Download fcwin088 — Download fcwin088, also from BlackWingCat. Extract the cab file to a folder on the system drive (probably the C: drive). The extracter won't create the folder for you; you'll need to do this first. For ease of access, we created a folder right in the root of the drive (C:\fcwin088), but you may want to be more organized. Just extract the cab file to some folder where you'll find them later, particularly a new folder you create just for these files. In particular, the files you will need are called NNN4NT5 and fcwin2k.
- Run fcwin2k to open Office 2007 installer — OK, now install Office. It probably won't work if you just try running setup.exe directly. Open the fcwin2k.exe executable you just extracted into the fcwin088 folder. A window should pop up. The fcwin2k program tricks individual programs into thinking they're being installed on an OS that is, well, not the OS they're actually being installed on.
Click the first "Refer" button (next to File) and locate the setup.exe executable for the Office 2007 installer. For the dropdown for OS Ver, choose Windows XP SP3. Then click CompatSave and then RunCompat. - Install Office 2007 — Now, setup.exe should successfully open (maybe you'll get an error, but you won't get the "This program requires a newer version of Windows". You won't able to enter the product key (you won't be able to click in the field). We'll fix this later. For the time being, just click Continue.
Groove does not work in Windows 2000, so make sure you change Groove to not available. Everything else is fine to install. Click Next and finish running the installer. - Install Office 2007 SP3 — Go ahead and install Office 2007 Service Pack 3 right away (SP3 is no longer available from Microsoft, but fortunately, Wayback has archived it). Simply run the executable and install. You should not need to use fcwin2k to install SP3; it should work "normally".
- Run NNN4NT5 — At this point, if you open any Office application, you'll get the "This program requires a newer version of Windows" error. If you dismiss the first error, wait, and then dismiss the second error, you should be able to click around the Office program and see that it mostly works. But, as this is less than ideal, as it will happen every time you open an Office program when one was not already currently running, we'll prevent this from happening.
In the fcwin088 folder, there is an executable called NNN4NT5. When you run it, it should be pre-filled with Windows XP information. NNN4NT5 will fool the whole system into thinking it's Windows XP. This is not desirable if you need to install 2000-specific software or MS OS components targeting W2K (like the optional Remote Desktop Connection client, not included by default in Windows 2000), but you can easily revert the changes when we're done.
Tip:If you need the Remote Desktop Connection client, install this before proceeding using the add-on installer for Windows 2000. It won't run if it thinks you're running XP, so either do this now or revert the NNN4NT5 changes later to install RDC and then reapply the NNN4NT5 changes again. - Download USP 5.1 — If you tried opening an Office program now, you won't get the same error as before but likely one saying msvcr90.dll could not be found. To fix this, download the Unofficial Service Pack 5.1 for Windows 2000. You don't actually need to install this, because you already slipstreamed HFSLIP. We just need one specific DLL file that the USP contains.
CAUTION: USP 5.1 seems to include buggy USB drivers, see:- https://msfn.org/board/topic/156521-unofficial-sp-52-for-microsoft-windows-2000-wip/page/76/
- https://msfn.org/board/topic/129829-usb-functional-patches-for-win2000-after-sp4-and-r1/#comment-837504
The extended kernel updates riched20.dll. riched20.dll is the backbone of the OS's Rich Text Format engine. This is used to display EULAs in Windows installers, which is why the product key could not be previously entered into the dialog. To fix this, extract the contents of the USP 5.1 executable with 7-Zip. You'll find a riched20.dl_ file — extract this file with 7-Zip again, and inside you'll find a riched20.dll file. This is the "good" version of the DLL, which will replace the one currently on your system.
Once you have the good version, replace the riched20.dll in C:\WINNT\system32 with the one you extracted from USP 5.1. If it makes you feel better, you can backup the current DLL, but it's not necessary.
Update: Actually, you don't need USP 5.1; just use the same procedure to get the original riched20.dll from the HFSLIP files. - Activate Office 2007 — Close all running Office applications (if you didn't already), and fire up one of them again (say, Word). An "Enter Your Product Key" window should pop up again, but this time, unlike during setup, you'll be able to enter your product key. Click Next, and the installer will say it's continuing installation (even though Office is already installed). In a few seconds, the wizard should be complete.
- Ensure Calibri Works — Calibri is the default font in Office 2007. Open Word and start typing, and see if it looks like Calibri or something else. Change the text to Cambria and make sure you observe a change. If not, navigate to C:\WINNT\system32\Fonts and ensure that the Calibri font file is there. Open it up and then re-open Office and see if the fonts load now.
- Download Crypto Updates For Windows XP — By now, Office will mostly work, and you'll be able to open and save files normally. However, you probably won't be able to open files encrypted in newer versions of Office, despite the fact that you should be able to with SP3. To fix this, you need to replace some DLL files with those for Windows XP. The DLL files needed are in the KB3081320 and KB2868626 updates.
Visit Microsoft Update and download KB3081320 for Windows XP Embedded. The exact update should be something like "Security Update for WEPOS and POSReady 2009 (KB3081320) Windows XP Embedded Security Updates", 11/9/2015, 719KB.
Visit Microsoft Update again and download KB2868626 for Windows XP. The exact update should be something like "Security Update for Windows XP (KB2868626) Windows XP", 11/11/2013, 754KB.
We're going to need to replace dssenh.dll, rsaenh.dll, and schannel.dll with the ones from the KB3081320 for POSReady update, and we're going to need to obtain crypt32.dll from KB2868626. - Extract Crypto Updates For Windows XP — You won't be able to use 7-Zip to extract the executables for the proper files. Instead, open a Command Prompt and navigate to the local folder where you saved the updates (say, the Desktop).
Assuming you downloaded the English update, you'll type a command like the following:C:\Documents and Settings\Administrator\Desktop>windowsxp-kb2868626-x86-enu_1a00424d2070b57a4d9e2e73e54d90f51bb0562a.exe /extract
We've included the prompt as well as the command here to illustrate, but just issue the command above. An "Extract" window will open; just click OK to extract the files. Do the same for the other update:C:\Documents and Settings\Administrator\Desktop>windowsxp-kb3081320-x86-embedded-enu_d8e991e08445605d85c48425684c7850d1d63a36.exe /extract
You can do them both at the same time, and the files from each update will get merged into the same folders.
Now, if you open the SP3QFE folder, you should see 5 DLL files. You need all of them except xpsp4res.dll. Delete that one and move the other 4 DLLs to a safe location. You can then delete the update executables and the other folders and files it extracted. - Download Replacer — Typically, you'll need to replace the DLL files when the OS is not booted. However, the Replacer utility allows you to replace them from within Windows, so you don't need to boot, say, a Linux Live CD. Download the tool from the tool's download page. Extract the ZIP download to a folder that is NOT on your Desktop, and then COPY that folder to your Desktop.
- Rename and move the XP crypt32.dll — Rename the crypt32.dll from the extracted update to crypt33.dll. Then, move crypt33.dll to C:\WINNT\system32. The reason we are adding crypt32 as crypt33 is so we can use both the original crypt32 and XP's crypt32. The original crypt32 is needed for Outlook to work, but the updated crypt32 from the XP hotfix is needed for encryption to work. So, we're going to have our cake and eat it, too.
- Replace original DLLs with the 3 remaining DLL Files — The other 3 DLLs will completely replace the DLLs currently in use, unlike crypt32/crypt33. Open Replacer.cmd to begin. It will instruct you to download the original file to replace into the script. Thankfully, Microsoft made our lives easy. The four three are all in C:\WINNT\system32.
Here are the three files again:- C:\WINNT\system32\dssenh.dll
- C:\WINNT\system32\rsaenh.dll
- C:\WINNT\system32\schannel.dll
One at a time, for each of the three files above, drag the original file from system32 into the script (or copy and paste the full path as given above). You'll need to press ENTER and then drag the replacement file into the console as well. The script will then tell you to reboot. You could reboot between replacing each file. Or, delete the Replacer folder on your Desktop, and then copy the original extracted folder back to your Desktop (or keep re-extracting the folder). You can't reuse the Replacer script after it's been used, so copy it back over again and do it again for each file, and then reboot once you've replaced all three.
Tip: You may need to wait a few seconds before deleting the folder (try renaming it if you get a sharing violation error). Ignore any system integrity warnings. - Download HxD — The next step involves hex-editing a file. Download the portable HxD hex editor and extract the editor.
- Run HxD — Run HxD. It will confirm setting up a profile in the current folder; just accept as you can delete the folder containing the portable program later. Click the Open icon in the upper left and open up the following file in the hex editor: C:\Program Files\Common Files\Microsoft Shared\OFFICE12\MSO.dll
- Perform the hex edit — Press CTRL+F to search for "crypt32" (without quotes). There should be one match. Replace the 2 in crypt32 with a crypt33. (Don't backspace and then type 3; instead, highlight-select the 2 and then hit 3 on your keyboard). If you search the file again, there should now be no matches for a search for crypt32. Save the file and exit. You can now delete the hex editor files.
What have the last few steps accomplished? The original BWC crypt32 stays while XP's is copied under a new name. The other three BWC files are replaced with the XP files. This combination satisfies both decryption in Word, Excel, etc. as well as Outlook. No Outlook files need to be modified. - Obtain latest root certificate update — Had you need performed the steps necessary to allow encryption to work properly, Outlook would have worked just fine. If you had replaced crypt32 rather than keeping both, Outlook would basically be completely broken. Now, Outlook works again, but you may notice you get security certificate warnings when opening Outlook. You can dismiss the warning and continue using Outlook, but the dialog will appear every time you start Outlook, so it can quickly get annoying.
To remedy this, install the latest root certificate update (July 2019) from BlackWingCat's Windows Legacy Update. The site is mostly in Japanese, again, so here's what to click: On the landing page, click "Manual Update" on the lefthand sidebar. Fill in the form fields appropriately: OS Type is Windows 2000; Kind is Other Update. For Search Keyword, type "root" without quotes and click Search. At the time of this writing, the desired update was all the way at the bottom, the second-to-last one. It should be titled "Update for Root Certificates Jul 2019..." Click on this and it will download rootsupd201907.exe. - Install latest root certificate update — Now, simply run the executable. It only takes a second to complete. Now, the security certificate warnings won't appear anymore.
- Enable font edge smoothing — Finally, in order to get newer Office 2007+ fonts like Calibri to look good in Windows 2000, right-click on the Desktop and click Properties. Go the Effects tab and check the checkbox for Smooth edges of screen fonts.
That's it! Now, your copy of Office 2007 should be (mostly) fully working*, and you will even be able to open files encrypted in newer versions of Office, while also retaining the ability to use Outlook!
Caveat: Unfortunately, we've confirmed you can't edit encrypted files in Office 2007, even though you can open them. This is true even if crypt32.dll is replaced and even if it's a document created and encrypted in Office 2007. It won't work. So encrypted documents in Office 2007 are view-only, effectively, until we can find a fix/workaround for this.
On the bright side, we're no worse off than with Office 2003, and better off in many other respects, so unless you edit encrypted documents a lot, you shouldn't be too much worse for the wear.
For the best experience, now go setup Outlook 2007 using our Outlook 2007 guide.
If you prefer not to use Outlook, we recommend MailNews, based on Interlink, which is still being updated and is similar to Thunderbird but with the traditional UI instead. For more details, see our page on the MailNews client.
*For the most part, everything more or less works. Some elements in the UI don't appear quite right. For example, in Outlook, if you go to Tools → Account Settings, you'll see that your account is highlighted but all the text is invisible, as it likely expects a different XP-style UI rendering routine (unconfirmed). However, this is far from being a usability issue, since it's not something you'll access on a daily basis, and when you do, you can click Change to see which account was selected. In other news, Exchange accounts don't work, but they don't seem to work in XP with Outlook 2010, either, so this is hardly news here.
More Usability Tweaks
Windows 2000 Professional comes with the Local Group Policy Editor. Today, some versions of Windows don't, but back in 1999, Microsoft was giving all versions of Windows their all. Go to Start → Run and type gpedit.msc and hit ENTER to open the Local Group Policy Editor. If your PC is connected to a domain, then you should not use Local Group Policy but domain Group Policy. If you have a domain, then you probably know how to do that, so we'll just get right to listing our recommended Group Policy tweaks to Windows 2000 Professional for increased usability, security, and an overall better experience:
- Computer Configuration\Windows Settings\Security Settings\Local Policies\Security Options\Disable CTRL+ALT+DEL requirement for logon: Disabled
- Computer Configuration\Windows Settings\Security Settings\Local Policies\Security Options\Do not display last user name in logon screen: Enabled
- Computer Configuration\Administrative Templates\Windows Components\Internet Explorer\Disable Periodic Check for Internet Explorer software updates: Enabled
- Computer Configuration\Administrative Templates\System\Verbose vs normal status messages: Enabled
- Computer Configuration\Administrative Templates\System\Disable Autoplay: Enabled (All Drives)
- Computer Configuration\Administrative Templates\System\Don't display welcome screen at logon: Enabled
- User Configuration\Administrative Templates\Internet Explorer\Disable changing default browser check: Enabled
- User Configuration\Administrative Templates\Start Menu & Taskbar\Remove Documents menu from Start Menu: Enabled
- User Configuration\Administrative Templates\Start Menu & Taskbar\Add Logoff to the Start Menu: Enabled
- User Configuration\Administrative Templates\Start Menu & Taskbar\Do not keep history of recently opened documents: Enabled
- User Configuration\Administrative Templates\Start Menu & Taskbar\Disable personalized menus: Enabled
- User Configuration\Administrative Templates\Start Menu & Taskbar\Disable user tracking: Enabled
- User Configuration\Administrative Templates\Desktop\Remove My Documents icon from desktop: Enabled
- User Configuration\Administrative Templates\Desktop\Hide My Network Places icon on desktop: Enabled
Of course, logon scripts are applied through User Configuration\Windows Settings\Scripts (Logon/Logoff)\Logon. This is the best way to do things like map drives.
Unfortunately, there's no Group Policy Preferences to control Folder Options. If you're on a domain, you can use RunOnce and registry scripts to control advanced Windows Explorer settings. If not, the easiest way is to do it manually: first, go into C:\ and expand the size of the Name column. Then sort by Type. Then, right click on Modified and click Created so a check shows up next to it.
Now, without navigating away from the current folder, go to Tools → Folder Options. Click View. Perform the following modifications:
- Display the full path in the address bar: check
- Show hidden files and folders: select
- Hide file extensions for known file types: uncheck
Now, click "Like Current Folder" at the top, click Yes, and then click OK to exit the window.
For convenience, you can right-click "My Computer" on the Desktop and create a shortcut to it. Rename the shortcut to "My Computer" and then drag it to the Quick Launch toolbar. Now, you can easily launch Explorer from the taskbar (and right to My Computer), just like in newer versions of Windows.
Now, to add the logoff sound, go to Start → Settings → Control Panel → Sounds and Multimedia Properties. Click Exit Windows, then click the dropdown and choose "Windows Logoff Sound.wav" and click OK.
Finally, optionally, if you prefer the Windows 9x desktop icons, you can right-click on the Desktop, go to Effects, and then change the icon for My Computer & the two Recycle Bin icons.
Now, go download the latest software for Windows 2000 with KernelEx!
Additional Resources You May Find Useful (But Are Not Used In This Guide):
- BlackWingCat Chrome Tool
- Roots Update (201709) — needed to fix Chrome HTTPS issues — this is an old version, sufficient to make Chromium work, but the guide already uses a newer roots update, so you shouldn't need this anyways.
Bonus: Microsoft Office 2010
Although you'll be able to accomplish 99% of what you need to in Windows 2000, that remaining 1% can sometimes really get in the way. Some spreadsheet formatting may just not work in Excel 2007, and the inability to write to encrypted documents can sometimes get in the way. Fortunately, it's possible to somewhat seamlessly integrate applications that won't run on Windows 2000, modified or not, right into it. The procedure entails using VMware's "unity mode" to seamlessly run applications on a newer operating system directly from within Windows 2000.
Case In Point: Running Microsoft Office 2010, a la Windows Server 2003
- Obtain a copy of Windows Server 2003. The exact version doesn't matter, as long as it's a 32-bit one. For instance, the 32-but volume version of Windows Server 2003 R2 Datacenter (with SP2)will suit you perfectly!
- Obtain a copy of Office 2010 Professional Plus.
- Obtain a copy of VMware Player 3.1.3.
- Open the VMware Player 3.1.3 installer. If you get an error about, among other things, PAE, make sure PAE is enabled on your system (otherwise, you'll only be able to run 6.5.5, which doesn't have as good of a Unity Mode). Click "Next" until you get to the final "Continue" button that will install VMware. DO NOT CONTINUE. At this point, make sure your user environment variable is set to Windows XP. If not, use NN4NT5 to patch it.
- Download the BWC VMware Player script, required to get 3.1.3 (only for XP+) to install on W2K: download the one titled VM313a.zip
- Run the script. It should execute almost instantly (you'll need to press space to execute it).
- Download the Orca MSI editor and install it.
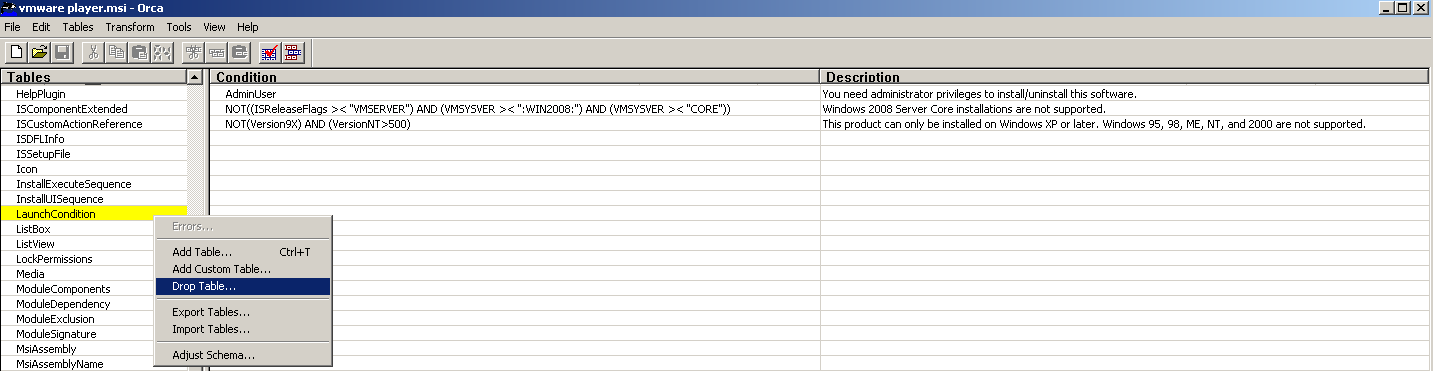
- Go into the Temp folder (C:\Documents and Settings\
\Local Settings\Temp) and look for the VMware setup files. Inside the folder, look for the vmware-player MSI installer. Right-click that and open it with Orca. - Delete the "LaunchCondition" table, as depicted below:
- Now, continue with installation, which should succeed. Reboot if prompted.
- Once Windows 2000 restarts, start VMware Player and create a new virtual machine, using your 2003 Server ISO. Setup should start running. When prompted, you MUST enter a password for the Administrator account (it can be anything; it doesn't need to be secure or complex… 123 anyone?). Also check the box to auto-login.
- Once Server 2003 is installed, you may find that you are not able to install the VMware additions (with an error re: the server). Download the VMAdditions for Workstation 7.1.3 (which correspond with Player 3.1.3).
- Use the windows one for XP+ and winPre2k for W2K and prior (so use the windows one for Server 2003). Go the VM menu and go to the CD drive to connect the ISO file. Then double-click the CD drive in Windows Explorer to begin installation. It may take awhile.
- When it is done installing, you will get prompted about improving hardware acceleration. This will be helpful. To do this manually, right-click on the desktop and go to the Settings tab. Click Advanced, then click the Troubleshooting tab. Drag the slider all the way to the right (to Full). Click OK and click OK again.
- Shut down the VM and then restart the host (Windows 2000).
- Once Windows 2000 starts, open VMware and start the virtual machine. Go to Virtual Machine → Virtual Machine Settings → Options.
- First, go to Shared Folders and click "Always Enabled". Click Add at the bottom and map each of the drives in Windows 2000, so working with files will be seamless in the 2003 VM. We recommend not mapping the system drives (e.g. drive C) and instead mapping only network drives in Windows 2000, assuming you store all your files in network drives and not on drive C (or if they are, stored somewhere on C: that is mapped as a drive). Effectively, once these drives are mapped, the VM's drives should more or less look like the host's drives. Note: do not check "Map as a network drive in Windows guests". It's not what it sounds like. It won't map the drives separately; rather it will map one drive containing all of them.
- If you already have a batch script that maps drives for Windows 2000, you can fork it into a slightly modified version to map the shared folders as drives in your VM, e.g.:
net use h: "\\vmware-host\Shared Folders\homedrive"
In this case, we mapped the shared folder "homedrive" as drive H: — so things line up, this assumes that this corresponds to what is actually mapped as drive H: in Windows 2000.
Note that adding all the shared folders as drives in VMware is one step, and creating the logon batch script to map them all is another one. - Download and install MSXML 6 (pre-req for Office 2010).
- Install Office using the ISO or setup files obtained earlier.
- Enter Unity Mode. Near the Start Menu, a flyout with the name of the VM will appear. Hover and then click on it. You'll see a mini Start Menu of Server 2003. For every single program in the VM you THINK you will ever need, including the "Run" dialog, and right-click it and click "Create Shortcut on Desktop".
- Now, go back to Virtual Machine → Virtual Machine Settings → Options. Go to Unity. Uncheck all the checkboxes currently checked (Show borders, show badges, and Enable Applications Menu). If you realize later you forgot an important shortcut, come back here and re-enable the Applications Menu, create the shortcut, and then disable it again. That way, it's not in the way most of the time when you don't need it.
- Rename the shortcuts, e.g. rename "Run 'Windows Explorer' in 'Windows Servers 2003'" to simply "Windows Explorer", etc., unless the distinction between a virtual and local program is not obvious. This way, the shortcuts appear to be to programs install natively on W2K.
- Open the Registry Editor (regedit.exe - use the "Run" shortcut you made earlier!)
- Navigate to: HKEY_LOCAL_MACHINE\SOFTWARE\Microsoft\Windows NT\CurrentVersion\Winlogon
- DefaultUserName should be Administrator (only change this if you are using a different username).
- Click Edit → New → String Value. Type DefaultPassword and hit ENTER. Double click it and type your password and hit ENTER again. Note that DefaultPassword cannot be blank (no password) or auto-login will not work. As much as it makes no sense, you must have a password to login without the password!
- Click Edit → New → String Value. Type AutoAdminLogon and hit ENTER. Double click it and enter 1 and hit ENTER.
- If the VM is connected to a domain, make sure the DefaultDomain value is set per the link above; if it is on a domain, though, you should be considering a more seamless way of rolling these changes out rather than doing this manually.
- Exit Registry Editor.
- Computer Configuration\Windows Settings\Security Settings\Local Policies\Security Options\Interactive logon: Do not require CTRL+ALT+DEL — Enabled
- Computer Configuration\Administrative Templates\System\Display Shutdown Event Tracker — Disabled
- User Configuration\Windows Settings\Scripts (Logon/Logoff) - click Logon, click Add, click Browse. Right-click, click New, click text document and rename it "map.bat" (without quotes). Paste in the contents of the logon script you wrote earlier, with all paths in the \\vmware-host\Shared Folders\foldername format.
Right-click on the Desktop and go to Screen Saver. Uncheck the box that says "On resume, password protect". Then, using the dropdown, change the screensaver to (None).
This next phase involves using the Registry and Local Group Policy Editor to make the VM behave more "invisibly" so programs running on it can integrate with the host more seamlessly. Note that these are NOT generally recommended Group Policies. They are policies that will make programs more seamlessly integrate into the host OS. (The policies earlier in this guide are the generally recommended ones for any Windows system, more generally.)
Registry Tweaks:
This will automatically login to Windows Server 2003 so you are not prompted for to click OK to login:
Group Policies (gpedit.msc):
Restart Server 2003 for changes to take effect. If still prompted about a default floppy drive, choose the option to not warn about this again.