How to "Fix" MailNews
MailNews Setup Guide
This guide focuses on making MailNews more usable. MailNews runs on all versions of Windows NT, from Windows 2000 through Windows 10. Like Outlook, it requires a number of adjustments to make it usable, though the changes are very different, and the steps are, too. This is a complete guide on MailNews from start to finish. Let's go!
First, note that MailNews is based on Interlink Mail & News, which is very similar to Thunderbird. In fact, MailNews looks almost identical to Thunderbird, except it retains the older UI instead of the new Australis interface. Basically, MailNews/Interlink is to Thunderbird as New Moon/Pale Moon is to Firefox.
- First, you'll want the latest version of MailNews. A new build is released fortnightly, so you should download the latest one, which will appear at the top of this page - or use the installer script on the homepage of this site for easier installation.
- No installation is required, just like with roytam1's forked browsers (which can also be downloaded from the server of the page above). Simply run interlink.exe in the unzipped directory.
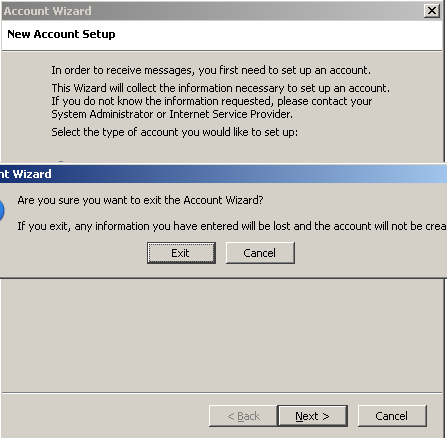
Note: No installation does not mean portable. Your mail does not get stored in the folder you extract; it gets stored in the usual Application Data folder. - For now, don't set up any accounts. Choose "Don't import anything" and click Next. On the New Account Setup page, click Cancel to exit the wizard. Click Exit. Some settings that we need to change only affect folders created after the fact, so the settings need to be changed before any accounts are connected.
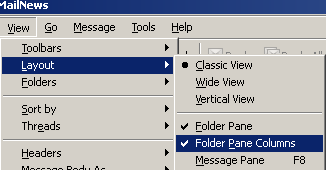
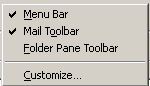
- Go to View → Layout, and toggle Folder Pane Columns ON and Message Pane OFF.
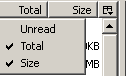
- Right-click on the Total column header that appeared and select "Size", so that it is checked, like so:
- At this point, you may wish to expand the Navigation bar a little bit so it takes up more room. This way, you'll still be able to see the full names of all your folders.
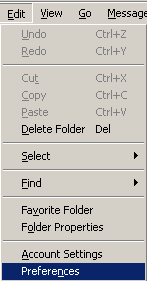
- Now, go to Edit → Preferences.
Uncheck the box under MailNews Start Page: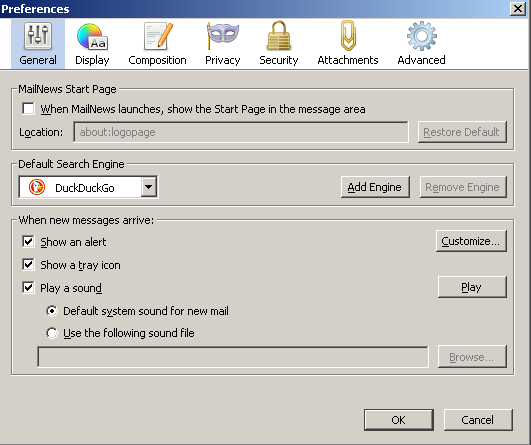
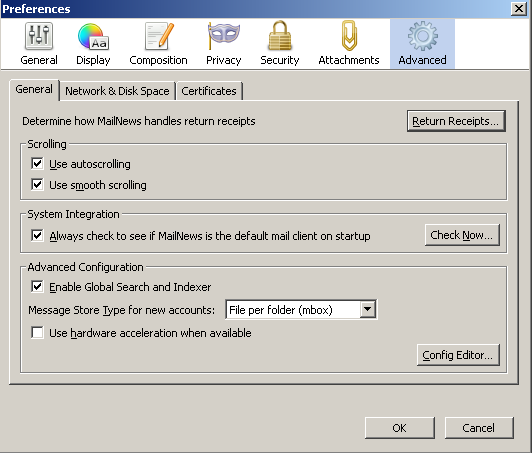
- Now, go to the Advanced tab. Near the bottom, click Config Editor.
If you get the warning below, just click the blue button (you may also wish to uncheck the checkbox above it):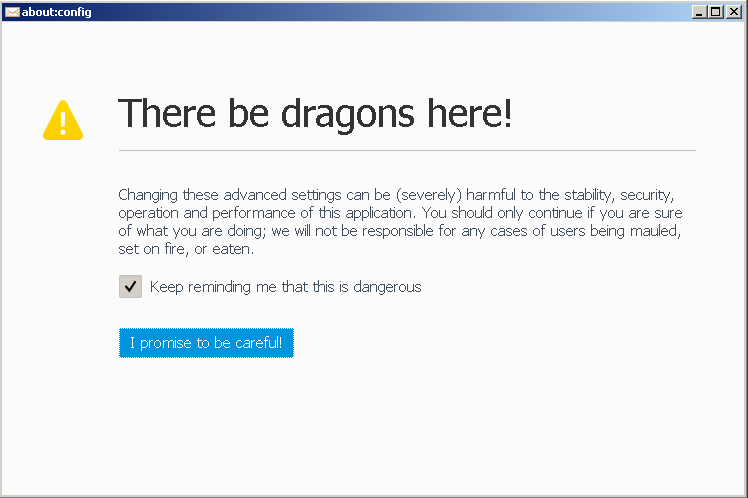
- In the search box, search for each of these preferences and change the value accordingly:
Preference name Change to: What this means mailnews.default_view_flags 1 Messages appear threaded mailnews.default_sort_order 2 Newest messages show up near the top, not the bottom mailnews.customDBHeaders Received Forces MailNews to download the Received header for each message. This is necessary because by default, the Received column falsely mirrors the Date (Sent) column. Downloading the header will force Received to show the actual Received time. If other text is already here, add this to the end with a space before it. mailnews.headers.showUserAgent true Show the User Agent header (if it exists) in the header metadata at the top of all emails.
I enable this because I like seeing what mail client users (or systems) use to send email, but if you don't care for it, feel free to skip this.When finished, exit the window. Click OK and then close and restart MailNews.
- Right-click on the toolbar at the top and click Customize:
- Scroll down to the bottom until you see "Mark".
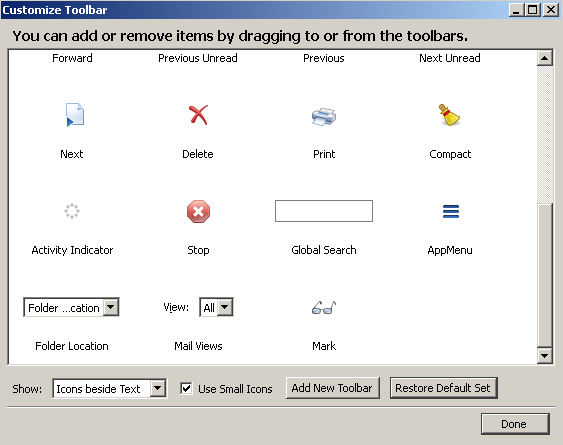
- Select "Mark" and drag it to the toolbar. It should now look something like this:

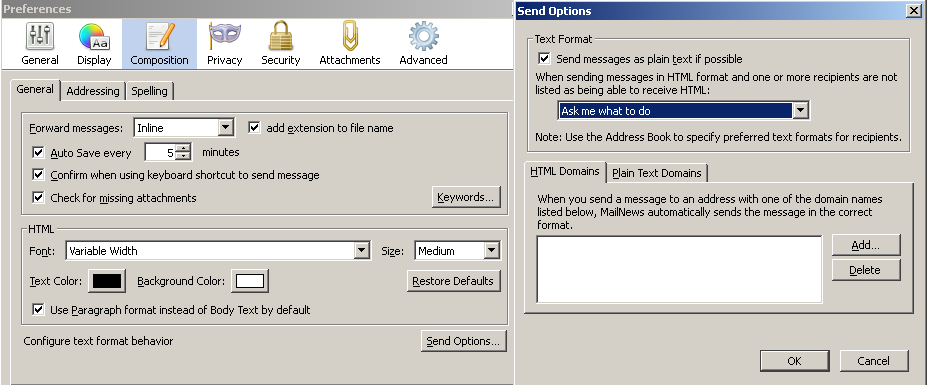
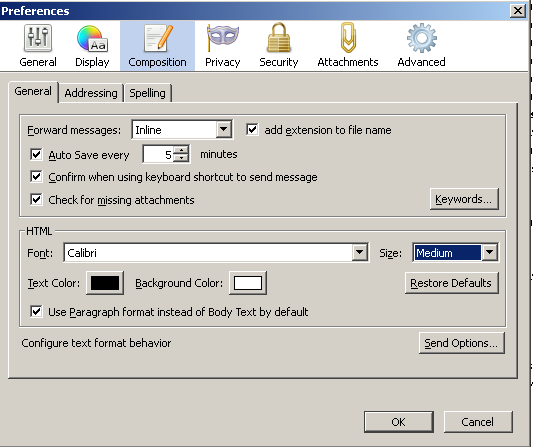
- Go to Edit → Preferences → Composition. If you wish, change the HTML font dropdown to Calibri.
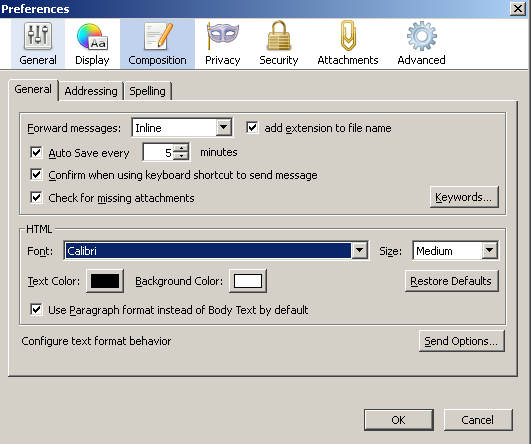
- Now, still on the "Composition" tab, click Send Options. For the dropdown, click "Ask me what to do". Click OK.
- Now, you can click "Create a new account". MailNews will walk you through setup of your first account. At this time, only connect one account.
For your convenience, here are the servers and ports of a few popular mail providers:Google IMAP: imap.gmail.com (SSL, port 993) SMTP: smtp.gmail.com (SSL, port 465 OR TLS/STARTTLS, port 587) Outlook IMAP: outlook.office365.com (SSL, port 993) SMTP: smtp.office365.com (STARTTLS, port 587) Yandex: IMAP: imap.yandex.com (SSL, port 993) SMTP: smtp.yandex.com (SSL, port 465)
The default settings for adding an account are just all wrong and won't work. Follow the configuration steps in the below section (Steps Per Account) for detailed instructions on how to correctly add all of your accounts.
Account Setup: Steps Per Account
You will need to repeat all of these steps for every single email account that you add!
- Go to Edit → Account Settings
- Click Add Account in the lower left
- Email account should be pre-selected. Click Next. Then enter your display name and email address. Click Next.
- Select IMAP and change the port to your server's IMAP port (most likely 993).
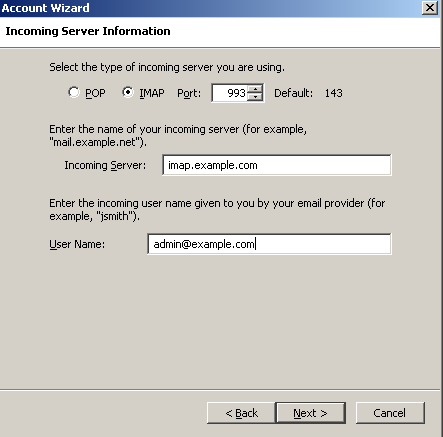
- You will get a notice saying that your existing SMTP information will be used. This is very bad! We will change this momentarily. You won't be able to send email until then.
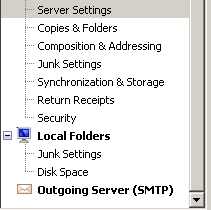
Click Next and then Next again. The SMTP information will be wrong, but click Finish, since we can't change this until the wizard is complete. - The account you added will now show up under Account Settings. Click on Server Settings for the account you added in the lefthand pane:
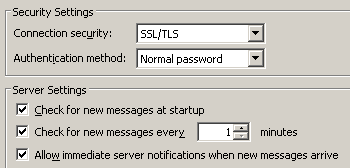
- Change the Connection Security from None to SSL/TLS (unless your server settings are different; most IMAP servers use SSL).
- Check the box that says Check for new messages at startup. Directly underneath that, change the interval to 1 minute.
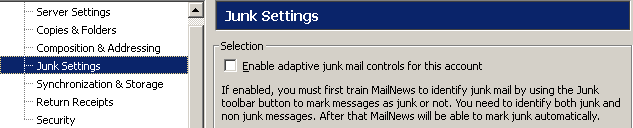
- Go to "Junk settings" and uncheck the top checkbox:
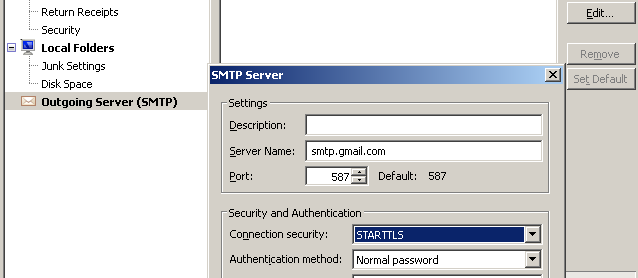
- Back in the main Account Settings window, click on your email address itself (the root menu for it). At the bottom, you should see an Outgoing Server option like so:

Click the dropdown and choose the one that corresponds with your email address (it should NOT be set to "Use Default Server"). Then click OK. - In Synchronization Settings, click Advanced. Scroll down to the Junk/Spam and Trash folders and check the checkboxes.
- Now, click OK at the bottom of Account Settings. If you get a warning about Junk settings, click No.
- Navigate to the Inbox of the new email account. If you click on it, you should be prompted for your password (you don't remember having entered it yet, do you?) Enter it and check the checkbox and then click OK.
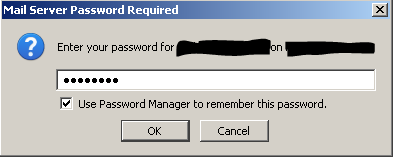
If you are not prompted for your password and MailNews just appears to do nothing, close MailNews. Open Task Manager and kill the process interlink.exe — then reopen MailNews and click on Inbox. It should now prompt for your password. - Now, MailNews will begin downloading all of your mail. While it's doing that, compose a new email to yourself. The subject and content is not important; send it to the same email address (back to yourself).
- You will get a prompt similar to the one before asking you for your password. You need to enter your password once for IMAP and now once more for SMTP. As before, enter your password, check the checkbox, and click OK. (One real major annoyance is, unlike Outlook, you are not asked for your password during setup; instead, you are asked for it the first time you try to receive and send mail, individually and independent of each other. A terrible design choice, in our opinion, but we didn't design the software. Sending the test email to yourself now will ensure when you do send your first email, you're not suddenly inundated with a password prompt.)
- You can now delete the test email you sent yourself. At this point, you'll be able to send and receive mail, but we're not quite done yet. If this is the first account you're setting up, jump to Post-Setup A. If you've already set up an account before, jump to Post-Setup B.
Post-Setup A: First Account
- Go back to View → Layout and recheck to make sure Message Pane is still disabled. If not, disable it again.
- Navigate to the Inbox or any custom folder of your choice.
- Right-click on a column header or click on the icon indicated with the arrow below:
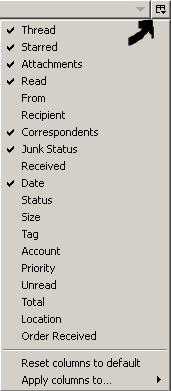
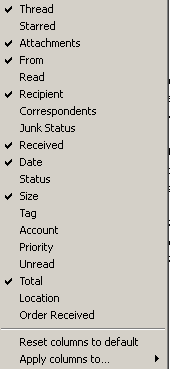
- Uncheck and check the columns until your column list looks like this:
- Adjust the width of each column appropriately. From and Recipient should be roughly the same width; Received and Date should be roughly the same width. FYI, "Date" here is specifically the Sent date (as opposed to the Received date).
Your column headings should now look something like this:
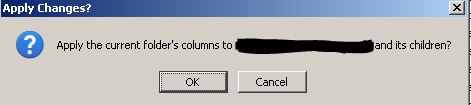
- Right-click on a column header or click on the columns icon again. At the very bottom, select "Apply columns to". Then select "Folder and its children". Go to your email address, and then in the menu that appears containing all of your folders, click on your email address, which should be at the very top of the submenu. Click OK to confirm.
- You should now add the rest of your accounts. You will need to follow the Account Setup procedure above for each account, but for all subsequent accounts, after finishing the primary setup procedure, follow the steps below in Post-Setup B.
Post-Setup B: All Subsequent Accounts
- Go to Edit → Account Settings and navigate to your account.
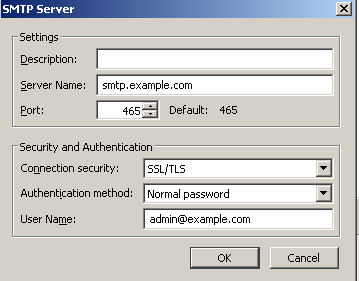
- Now, click Outgoing Server (SMTP) in the lower-left corner. Click Add to add your new account's SMTP information. You need to do this for every account, even if the server is the same.
- Leave the Description blank. Enter your SMTP server and then change the connection security to either SSL/TLS or STARTTLS. There's no real standard for which one SMTP uses, so be sure you know which method your SMTP server uses. The port should automatically be adjusted to the correct one based on your choice. For User Name, enter your email address. Then click OK.
- Navigate to the Inbox or custom folder of an account you previously setup.
- Right-click on a column header or click on the columns icon. At the very bottom, select "Apply columns to". Then select "Folder and its children". This time, select the email address you just now added, and then in the menu that appears containing all of your folders, click on your email address, which should be at the very top of the submenu. Click OK to confirm.
- You should now add the rest of your accounts, as some steps will need to be done per-account, rather than universally. Follow the steps in the next section for each account.
When you're all done, you may wish to reorder the accounts. From the GUI, there's no way to reorder the order in which accounts appear.
It is possible to reorder the accounts. There are extensions that exist to reorder accounts; we recommend doing it manually, as this is the cleanest way. To do so, first take a look at the prefs.js file on your system. On ours, that was located here:
C:\Documents and Settings\Administrator\Application Data\Binary Outcast\Interlink\Profiles\14ciu5yj.default
Search for the preference name below (this is the ordering of accounts):
mail.accountmanager.accounts
It's worth noting the IDs used by this preference are not the identity IDs, but rather the server IDs beneath that. Look through prefs.js to get an idea of which IDs correspond to which accounts.
To edit this preference, you can open Config Editor (Edit → Preferences → Advanced → Config Editor) and search for mail.accountmanager.accounts — modify the value, keeping in mind the default account always appears first. Then, close and restart MailNews and see if your accounts have been reordered. You may need to tweak this a few times if reordering doesn't go as expected the first time.
A Word About Plain Text
You'll notice that, unlike as with Outlook, we didn't recommend as part of these steps changing default composition and viewing modes to Plain Text (as opposed to HTML). This is because Outlook cannot properly reply to messages at all unless plain text is always used at all times. In other words, replies are broken unless you use plain text to reply, and since replies are based off how you receive mail, you need to read all mail in plain text mode by default. Thunderbird and its derivatives are not flawed in that aspect, and even claim to send as plain text if possible to do so. While it is not feasible to use Outlook with explicitly forcing plain text for everything, that is not the case here, so we don't include it as part of the guide, but you can certainly opt for a Plain Text experience similar to Outlook's if you wish by doing the following:
- Click View → Message Body As → Plain Text.

- FOR EACH ACCOUNT: Go to Edit → Account Settings.
Under the email address, click on Composition & Addressing on the left and then uncheck "Compose messages in HTML format".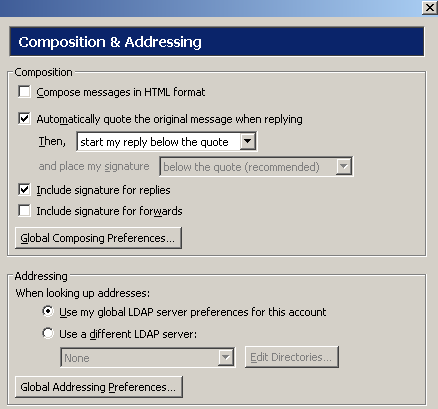
- Now, go to Edit → Preferences, and go to the Display tab. Click Advanced.
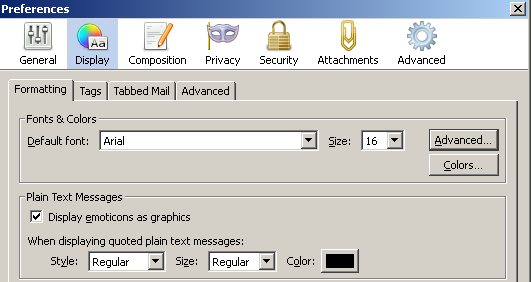
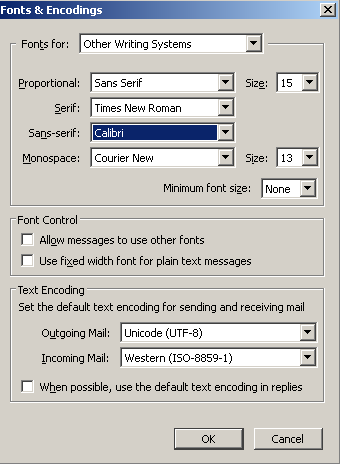
- To use Calibri instead Courier New for viewing and sending plain text messages, click the top dropdown and choose "Other Writing Systems". Change the Sans Serif font to Calibri and change the first font size to 15. Then, uncheck the two boxes under Font Control.
- Go to the Composition tab and change the font to Calibri.
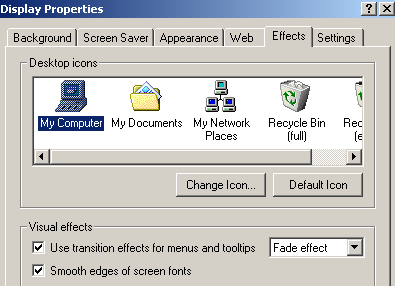
- At this point, minimize MailNews and right-click on your Desktop and go to Properties → Effects. It is imperative that "Smooth edges of screen fonts" is checked, or things will look even worse than they did before!